Professional product images aren’t just about having expensive equipment or a fancy studio. They’re about consistency, attention to detail, and understanding how to edit product photos to make customers trust your brand.
When shoppers can’t touch or try your products, your images become everything. A study by Justuno found that 93% of consumers consider visual appearance the most important factor when making a purchase decision.
In this guide, we’re breaking down how to edit product photos with AI for eCommerce product photo editing that converts.
Whether you’re just learning to edit product photos or looking to streamline your existing workflow, this comprehensive guide covers everything you need to edit product photos like a professional.
By the end of this article, you’ll know exactly how to edit product photos with efficiently and professionally.
Without any further ado, let’s get started with the article right away.
Table of Contents
How to Make Product Photos Look Professional?
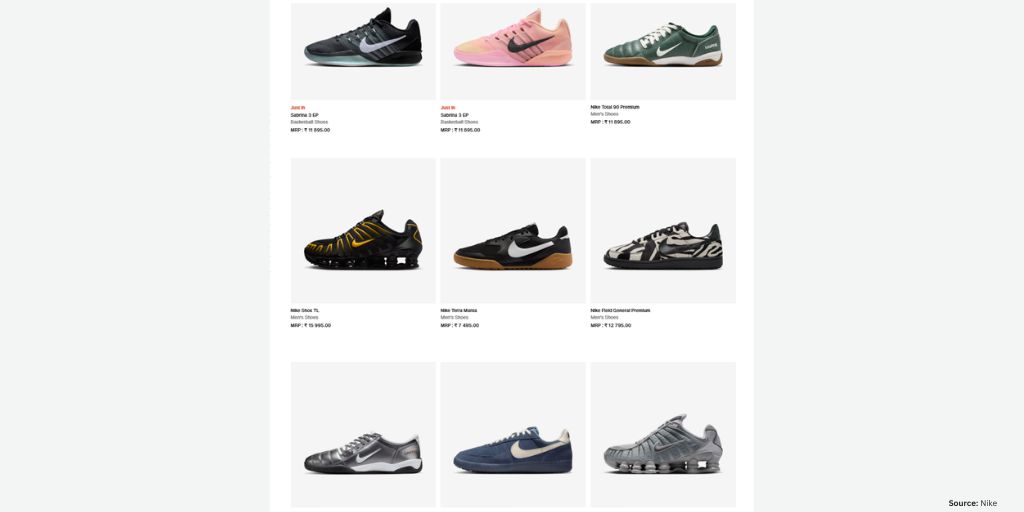
Use Consistent Background
Consistent backgrounds eliminate visual clutter and let customers focus on what matters—your products.
When backgrounds vary wildly between images, it looks unprofessional and makes your catalog feel disjointed.
Choose one approach and stick with it:
- Pure white (RGB 255, 255, 255) for marketplaces like Amazon and eBay
- Soft neutral tones (light gray, cream) for brand websites
- Lifestyle backgrounds for social media and editorial content
The key is consistency. If you start with white backgrounds, use white for all products in that category. Mixing background styles within the same collection creates visual chaos that hurts conversion rates.
Ensure Products Look Sharp

There’s nothing more frustrating for a customer than zooming into a product image only to find a blurry mess. Sharp, crisp images build confidence; blurry ones raise red flags.
Your images should show:
- Clear textures and materials (fabric weave, leather grain, metal finish)
- Visible product details (stitching, buttons, hardware)
- Crisp edges without distracting halos or artifacts
Think about it from your customer’s perspective. If they’re buying a leather wallet online, they want to see the quality of the leather, the precision of the stitching, and the finish of the hardware. Blurry images force them to imagine these details—and they’ll often imagine the worst.
If customers can’t see what they’re buying clearly, they won’t buy confidently. And when products arrive looking different than expected, returns skyrocket.
Use Natural Light

Lighting can make or break your product photos. Natural lighting reveals true colors and textures in a way that harsh artificial light simply can’t match.
Position products near large windows during daytime when the sun isn’t directly streaming in (diffused light works best). The soft, even illumination brings out details naturally without creating harsh shadows or blown-out highlights.
If natural light isn’t available, invest in daylight-balanced LED lights. These mimic the color temperature of natural sunlight (5500-6500K) and provide consistent results regardless of time of day.
Avoid: Harsh overhead lighting that creates unflattering shadows and yellow-tinted tungsten bulbs that distort colors. Both will require extensive color correction later when you edit product photos.
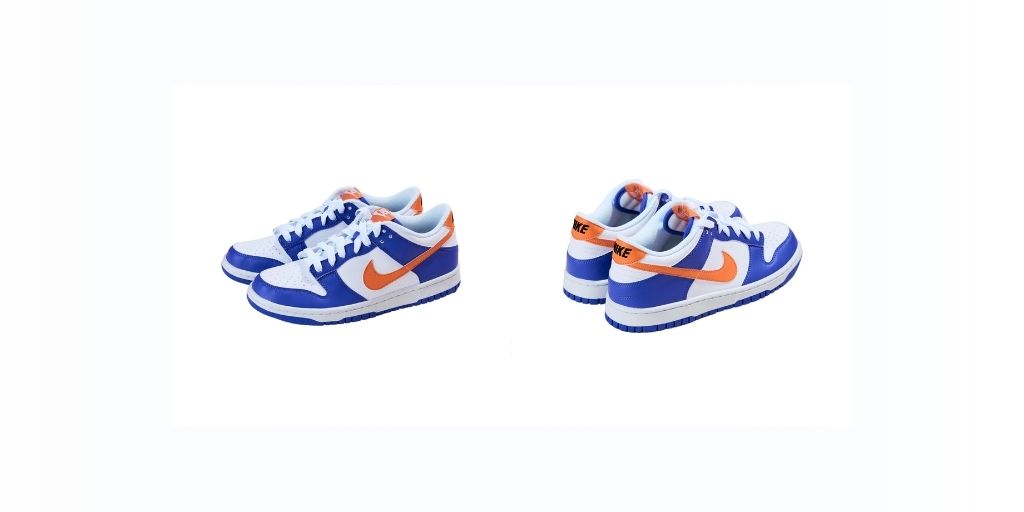
Ensure Consistent Alignment
Imagine shopping for shoes and seeing one pair photographed from the front, another from a 45-degree angle, and a third from directly above. Confusing, right?
Consistent alignment means using the same camera angle, distance, and product positioning for all items in a category. This matters most when customers compare variants—different colors of the same shirt, for example, or various sizes of the same bag.
This is the same reason why you will find global brands like Nike ensuring a consistent product presentation among all their products in a category.
Pro move: Set up your camera on a tripod and mark the exact product placement with tape. This ensures every shot has identical framing and perspective, making your catalog look professionally curated.
When alignment varies, customers spend mental energy trying to compare products instead of focusing on which one they want to buy. Remove that friction.
Remove Dust & Scratches
Even the smallest imperfection can derail a sale. Our eyes naturally gravitate toward flaws, and what seems like a tiny dust particle in the studio can look glaring at 2000 pixels wide.
Common culprits:
- Dust particles on dark surfaces (they show up white)
- Fingerprints on glossy items (especially phones, glasses, jewelry)
- Loose threads on fabrics (shirts, bags, upholstery)
- Water spots on glass or metal (vases, mirrors, kitchenware)
- Scratches on products themselves
The best approach? Clean thoroughly before shooting. Use microfiber cloths for glossy surfaces, lint rollers for fabrics, and compressed air for hard-to-reach areas.
But since perfection is impossible, when you edit product photos, AI editing tools can remove remaining imperfections in seconds.
Utilize Soft Shadow for Depth
Flat, shadowless products can look like they’re floating in space. Strategic shadows add depth and realism, making products feel tangible and grounded.
Three types of shadows to know:
- Drop shadows make products appear to rest on a surface. They’re subtle, soft, and positioned directly beneath the item. Perfect for shoes, electronics, and small goods that need to feel grounded.
- Natural shadows come from directional lighting and add dimension. These subtle gradations of light and dark reveal product shape and texture. They’re not added in post-production—they’re captured during photography or recreated to match natural light.
- Reflection shadows create a premium look, as if products are displayed on a glossy surface. Think high-end jewelry photography or luxury watch ads. These work exceptionally well for items that benefit from an upscale presentation.
The key is subtlety. Shadows should enhance realism, not distract. Overly dark or unrealistic shadows scream “amateur Photoshop job.”
Ensure Color Accuracy
About 22% of product returns happen because the item looks different from its photos. Color accuracy isn’t just nice to have—it directly impacts your bottom line.
The problem? Different screens display colors differently. Your product might look perfect on your calibrated monitor but appear completely wrong on a customer’s phone or laptop.
The solution: Convert all images to the sRGB color profile. This is the standard color space for web display, ensuring consistent appearance across devices and browsers. Most professional cameras shoot in Adobe RGB (which has a wider color range), but web browsers are built to decode sRGB.
Must-do steps:
- Shoot with proper white balance set in camera
- Edit in a color-managed workflow
- Convert final images to sRGB before uploading
- Test images on multiple devices (phone, tablet, laptop)
Color mismatches lead to disappointed customers, negative reviews, and costly returns. Get it right from the start.
How to Edit Product Photos with AI?
Now that you understand what makes product photos professional, the question becomes: how do you achieve these standards efficiently, especially when you have hundreds or thousands of products?
Traditional editing methods fall short for modern eCommerce when you need to edit product photos at scale:
- Photoshop: Steep learning curve, time-consuming, requires hours per image
- Freelance editors: Expensive ($15-50 per image), turnaround delays, inconsistent quality
- DIY manual editing: Exhausting, prone to errors, impossible to scale when you need to edit product photos in bulk
This is where AI-powered automation changes everything. When you edit product photos with AI tools, you save time while maintaining quality.
One of the fastest and most reliable ways to edit product photos is with Autophoto.ai. The ability to edit product photos at scale transforms how eCommerce businesses operate.
To get started: Sign up with Autophoto.ai now and create your blueprint alongside this article. You can start with a free trial to test the workflow before committing.
Let’s break down exactly how to set up your automated editing product photography workflow:
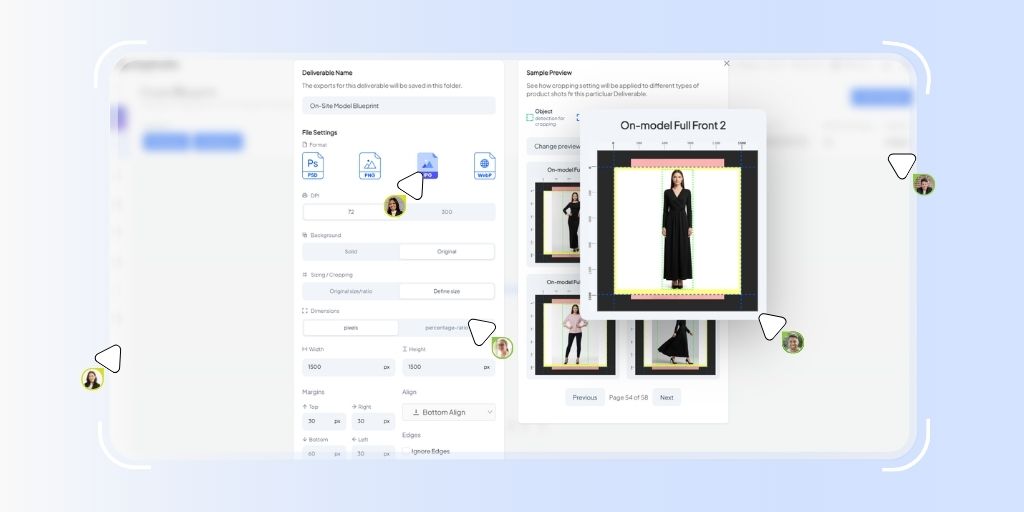
Creating Blueprint
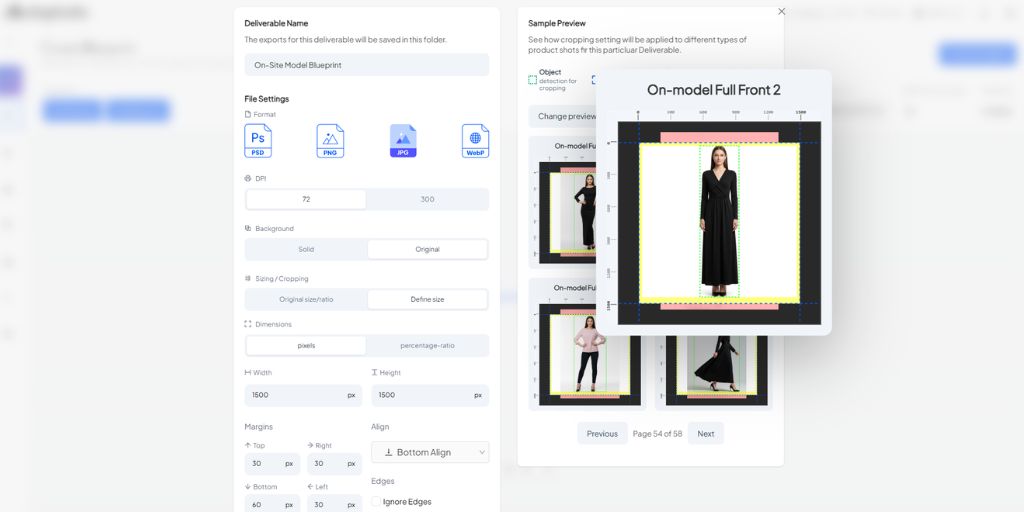
Blueprints are your custom editing recipes—the exact specifications for how you want every image edited. This is where you define your brand’s visual standards once, and Autophoto enforces them automatically forever.
Think of a blueprint as answering these questions:
- Should backgrounds be removed or kept?
- What color should the background be?
- Do you need shadows? What kind?
- Should products be retouched?
- What size should final images be?
- What file format do you need?
Once you’ve answered these questions and built your blueprint, you never have to think about them again. Upload 50 images or 5,000, and every single one gets processed identically. No human error. No inconsistency. Not forgetting to apply a step.
What you control in blueprints:
- Which editing actions to apply
- The exact order of operations
- Specific settings for each action
- Output specifications (size, format, naming)
Why this matters: Consistency is the hallmark of professional eCommerce stores. When every product image follows the same standards, your entire catalog looks curated and trustworthy. Inconsistency, even in small details, makes stores look amateur.
The beauty of the blueprint system is that you can create multiple outputs from a single blueprint for different needs. One for white-background marketplace listings, another for lifestyle social media posts, and a third for print catalogs—all automated.
Add Nodes
Nodes are the building blocks of your editing workflow. Each node handles one specific task, and you chain them together to create your complete editing process. Think of them like stations in an assembly line—your image passes through each station and emerges fully edited.
- Background Removal: Instantly removes backgrounds using AI, isolating your product with clean edges.
- Background Retouching: Cleans up existing backgrounds without removing them entirely.
- Product Retouching: Removes dust, threads, scratches, and minor imperfections from products while preserving authentic textures and materials.
- Model Retouching: Enhances on-model photography with natural-looking skin smoothing and blemish removal.
Add Exports
After your images pass through all the editing nodes, export settings control exactly how your final files look. This is where you specify technical details that make a huge difference in how your images appear online.
- File Format: Choose between JPEG, PNG, WebP, or PSD.
- Background Color: Select the background color for your image.
- Image Size: Set consistent dimensions across your catalog.
- Margins: Add breathing room around products so they don’t touch image edges.
Conditional Editing
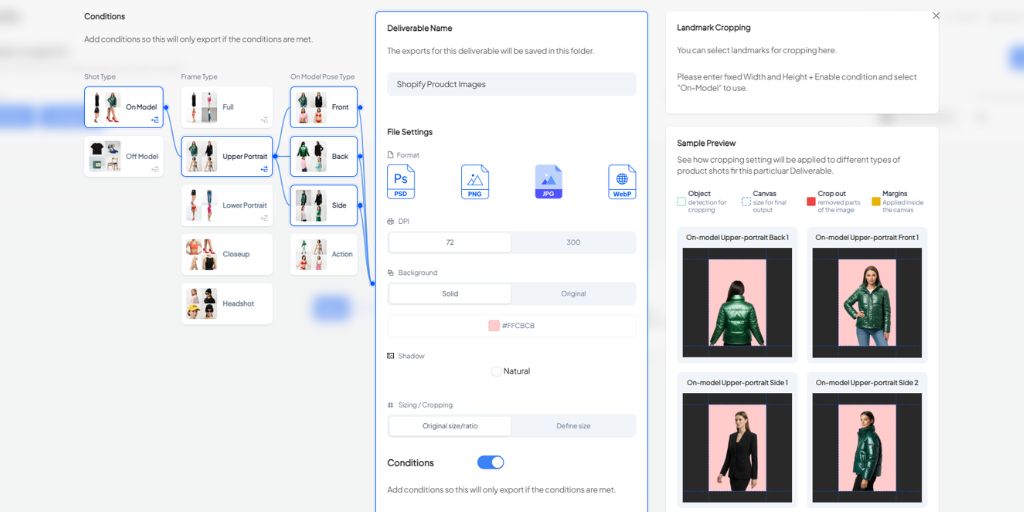
This optional step is a game-changer for eCommerce businesses with bigger product catalogs.
The problem: Different products need different editing specs. Shoes need different cropping than jewelry. Model shots need different settings than flat lays.
The solution: Set conditions so Autophoto automatically applies the right edits to each image type. Upload mixed product types, and Autophoto sorts and edits them correctly—no manual organizing needed.
How Does It Work?
Using the node based blueprint, you can create conditional export setting to edit product photos.
Example Conditions
- IF image contains model + Front pose → THEN crop above model’s lips
- IF product type = Shoes → THEN add drop shadow + specific margins IF product type = Jewelry → THEN add reflection shadow + tighter crop
The result: Upload 500 mixed images of shoes, jewelry, and apparel. Autophoto detects each type and applies category-specific edits automatically. No sorting, no manual work—just smart automation.
Upload Batch

You’ve built your blueprint and configured your settings. Now it’s time to edit product photos at scale.
How to Upload
Upload images in three ways:
- Drag and drop: Individual files or small batches
- Upload folders: Entire product lines at once
- Connect cloud storage: Link Google Drive or Dropbox for team workflows
What You Can Edit
- 5 images: Test your blueprint with samples
- 50 images: Small collections or weekly additions
- 5,000+ images: Full catalog overhauls
The time investment stays nearly the same whether you’re editing 5 or 5,000 images. Your blueprint handles everything automatically with perfect consistency.
Review and Download
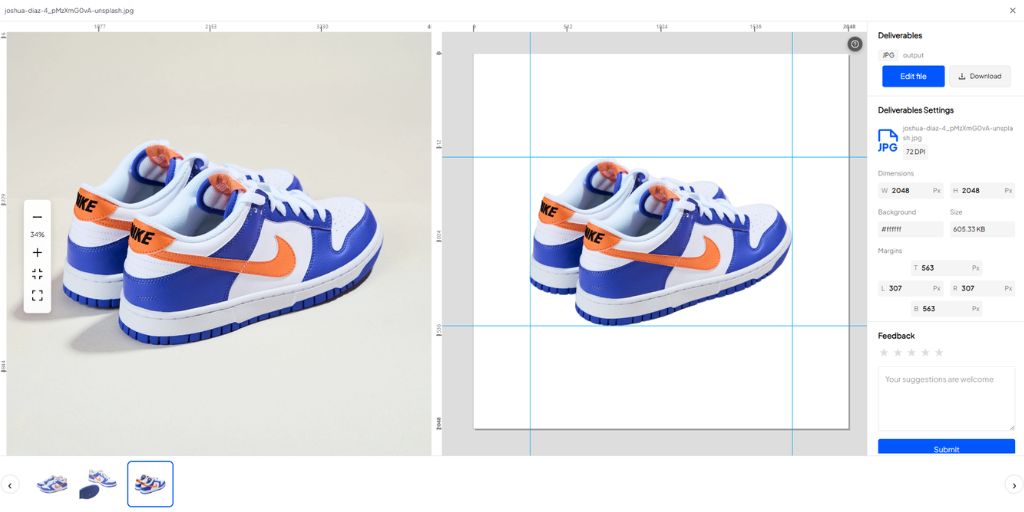
Before finalizing, Autophoto lets you review your edited images to ensure everything meets your standards.
View original and edited versions simultaneously to check:
- Clean background removal without edge artifacts
- Accurate, consistent colors
- Realistic shadow placement
- Natural-looking retouching
Download options:
- Immediate download: Get a zip file with all processed images
- Organized folders: Downloads maintain your upload structure
- Direct integrations: Export straight to Shopify, Amazon, or other platforms
Quality tip: Before downloading thousands of images, review 10-15 random samples from different categories to catch any issues early.
Conclusion
When you edit product photos efficiently, you unlock more time for strategic business growth. With AI-powered tools like Autophoto.ai, you can edit product photos for your entire eCommerce catalog in minutes while maintaining perfect consistency.
The real impact goes beyond time savings. When you’re not spending hours trying to manually edit product photos, you can focus on what actually grows your business—sourcing better products, improving descriptions, and running marketing campaigns.
Your product images are often the first impression customers have of your brand. Professional, consistent photos build trust, showcase details clearly, and convert browsers into buyers. Knowing how to edit product photos effectively is a crucial skill for any eCommerce business owner.
Ready to transform your product photography editing workflow? Start your free trial with Autophoto.ai and experience the power of rule-based AI editing to edit product photos effortlessly.
No credit card required, no commitment—just upload a few images and see the results yourself.