
Most ecommerce teams do not have a photography problem. They have a production problem.
The photos already exist. They sit in folders, inconsistently cropped, poorly named and rarely ready for every marketplace they need to support. A process that works for 50 images completely falls apart at 5,000.
At that scale, manual effort stops functioning as a workflow and becomes a bottleneck.
That’s exactly what a product image automation workflow solves. Instead of speeding up manual editing, it replaces it with a system that standardizes, processes, and delivers images consistently across every channel.
This guide covers what that workflow actually is, why it matters, what the pipeline looks like from start to finish and exactly how to build one.
Table of Contents
What Is a Product Image Automation Workflow?
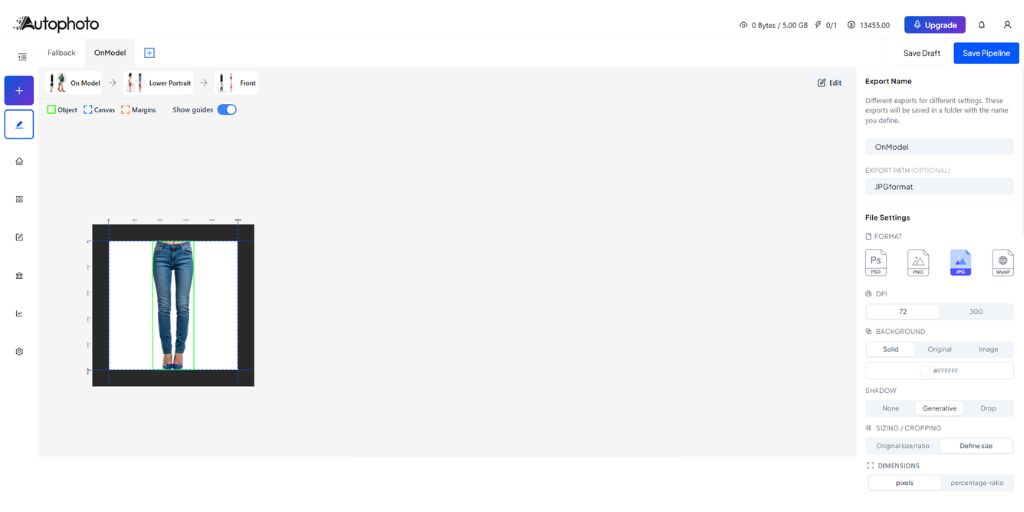
A product image automation workflow is a rules-based pipeline that takes raw product images and converts them into marketplace-ready outputs through a defined sequence of operations, without manual intervention at each step.
The defining word here is workflow, not batch editing. Batch editing runs one action across many files. A workflow uses conditional logic to process each image based on its actual type.
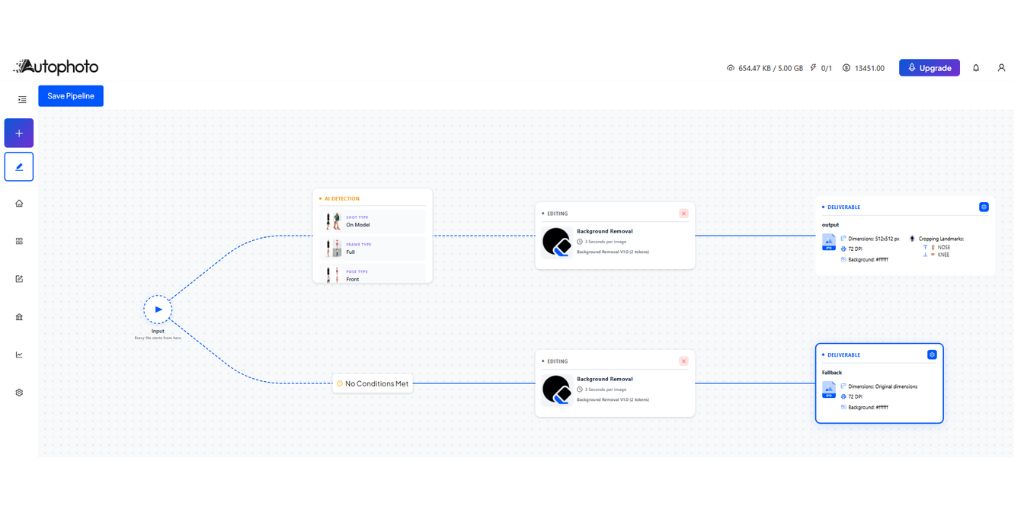
Here is a simple example. You set rules for an on-model front pose image to crop from torso to shoe, apply a white background, add a grounded shadow and export in multiple formats for different platforms. The system then applies this automatically to every image in one go.
At its core, image automation answers three questions for every file:
- Where do images come from
- How are they processed
- Where do they go after processing
Once those rules are set, the workflow runs the same way every time, whether you are processing 100 images or 100,000.
Why Image Automation Matters for Ecommerce Catalog Teams

Product visuals directly affect buying decisions.
According to Salsify’s 2025 Consumer Research Report, 77% of shoppers say high-quality images and videos are important to their purchase decisions. Separately, the conversion rate of high-resolution product photos is 94% higher than low-resolution photos.
The problem is not a lack of awareness. Most teams know images matter. The challenge is producing them at the speed and consistency that modern catalog operations require.
The National Retail Federation (NRF) and Happy Returns reported that total returns reached $890 billion in 2024, accounting for 16.9% of annual sales in the US. A significant portion of those returns traced back to mismatched expectations driven by inconsistent or poor product images.
Manual editing cannot keep up with these demands at scale. It introduces delays, inconsistency across photographers and editors and errors that compound across large catalogs.
Image automation solves this by applying the same processing rules to every image, reducing manual editing time, ensuring platform compliance and maintaining visual consistency across all listings.
What Does an Image Automation Pipeline Look Like?
A strong image automation workflow follows a four-stage pipeline:
Ingest → Tag → Crop → Export
Each stage has a specific role. Together, they form a complete, repeatable system.
Stage 1: Ingest
Raw images enter the pipeline from a camera upload folder, vendor portal, SFTP connection, or cloud storage. The decisions made at this entry point, file naming conventions and folder structure either set the workflow up cleanly or create problems downstream.
A well-designed intake stage accepts multiple input formats including JPG, PNG, TIFF and PSD without requiring manual conversion. It also preserves the original folder structure so files stay organized as they move through the pipeline.
Autophoto AI supports batch uploads of 5,000+ images and maintains folder structure throughout. For teams receiving bulk vendor-supplied images, this removes the pre-sort step entirely.
Stage 2: Tag
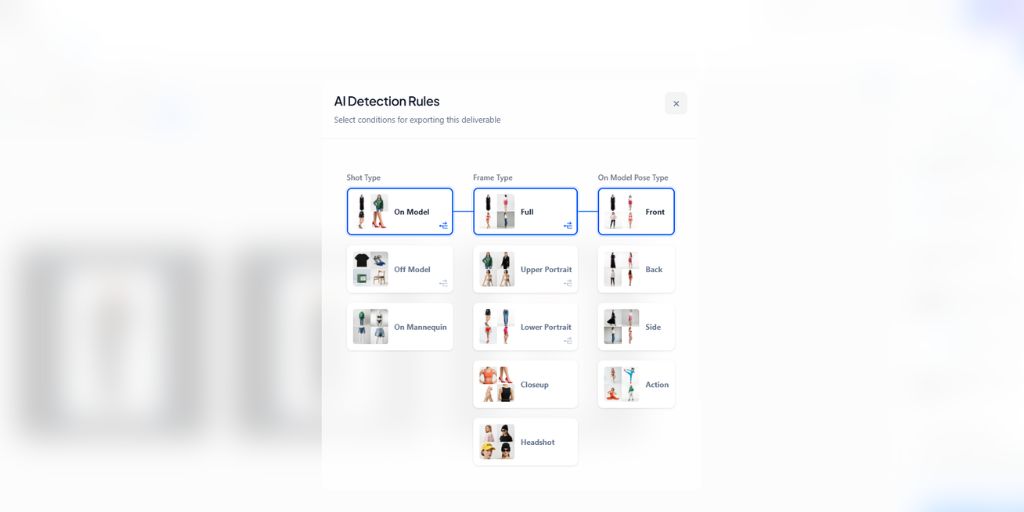
This is where image automation becomes intelligent. After ingestion, the system scans each image and assigns metadata automatically. These tags include:
- Shot type: On-model or off-model
- Pose direction: Front, side, back or action
- Frame type: Full body, portrait (upper or lower) or close-up
- Product category: Shoes, dresses, bags, bottles, jewellery and more
This tagging step powers every decision that follows. Without it, the system cannot distinguish between a front-facing shoe shot and a side-facing one, so it cannot apply the correct processing rules to each.
Autophoto uses computer vision to handle this classification automatically across thousands of images in a single batch, eliminating the need for manual sorting before processing begins.
Stage 3: Crop
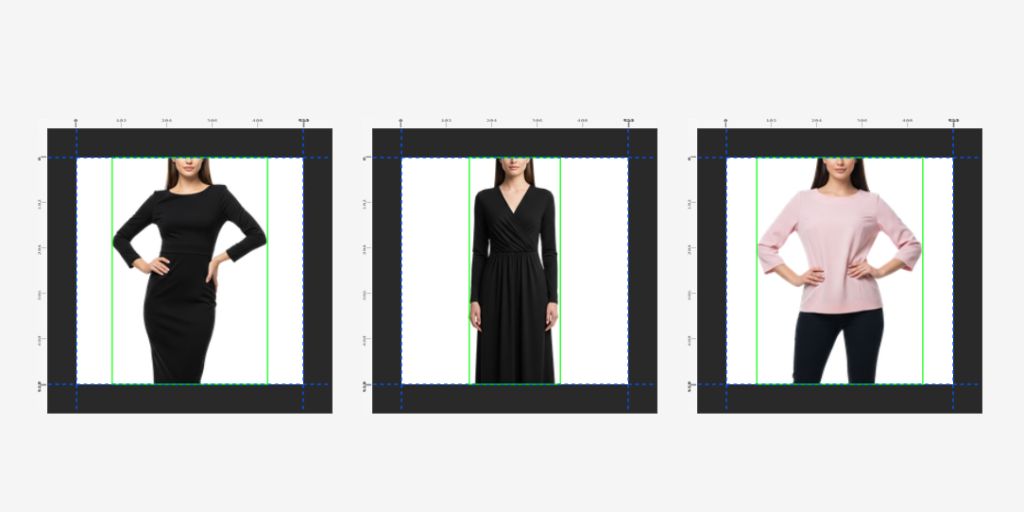
Manual cropping means opening every file and deciding where to place the frame. In an automated workflow, cropping is defined by body landmarks rather than fixed canvas percentages. This distinction is what makes consistent output possible at scale.
For on-model, this means telling the system to crop with the upper edge at the nose and the lower edge at knee. The system identifies those landmarks in each image and applies the rule consistently, regardless of model height or shooting distance.
A canvas-based preset says “start 10% from the top of the image.” A landmark-based rule says “start 20px above the chin.” When input images vary across photographers and sessions, only landmark-based cropping delivers consistent output across a full batch.
Autophoto’s body landmark detection covers the complete range of reference points: head, eyes, nose, chin, shoulders, waist, hand, knee, ankle and shoe. Each point can serve as either an upper or lower crop boundary depending on the product type.
Stage 4: Export
A single source image often needs to become multiple files for multiple destinations. Amazon requires a 2000×2000 white background JPG. Shopify works well with a 1000×1000 transparent PNG. Print production needs a high-resolution 300 DPI TIFF.
Conditional export logic handles all of this in one pass. You define the output rules once and the system generates every variant simultaneously. The variables that get automated in this stage include:
- File format (JPG, PNG, WebP, PSD, TIFF)
- Output resolution (72 DPI for web, 300 DPI for print)
- Background treatment (transparent, solid white, or original preserved)
- Shadow type (soft flatlay, grounded, or natural on-body)
- Canvas size and padding
According to a Forrester study cited by Shopify, companies that formalize workflow automation see a 248% three-year ROI. Each export rule set once compounds in value across every SKU the pipeline processes going forward.
What Can Be Automated and What Still Needs Human Judgment?
Image automation performs reliably on well-defined, rule-based tasks. It handles:
- Background removal on clean, well-lit studio images (Autophoto delivers 90%+ accuracy on standard ecommerce shots)
- Consistent cropping when input images are standardized
- Format conversion and resizing to marketplace specifications
- Shadow generation for product-on-surface photography
- AI tagging for recognized product categories
Human judgment is still necessary in specific situations:
- Images with reflective surfaces, translucent materials or complex backgrounds (glass products, mesh fabrics)
- Hero images and campaign shots where creative direction matters
- Edge cases flagged by the system with a low confidence score
- Any image where brand perception is the primary variable, not technical compliance
The practical framing is that image automation handles the 80% of your catalog volume that is repetitive and rule-based. That frees your team for the 20% that genuinely requires judgment.
The productivity gain does not come from removing humans from the process. It comes from redirecting them toward work that actually needs them.
Where Does Human QA Fit in the Pipeline?
Most teams treat quality assurance as a final review gate before publishing. That model does not scale and is not necessary with a well-configured system. QA works far better as three lightweight checkpoints built directly into the workflow.
Input QA happens before processing begins. A quick scan of incoming batch thumbnails catches images that will defeat automation: extreme blur, incorrect product orientation, missing reference shots. This stops bad inputs before they generate bad outputs downstream.
Sample QA happens after tagging and before export. Reviewing 3 to 5% of a batch at this stage confirms that AI classification is accurate. If the system encounters a product category it has not been trained on, catching the misclassification here is far less costly than discovering it after 2,000 images have been processed and exported incorrectly.
Exception QA happens after export. Platforms like Autophoto flag images that fell below confidence thresholds or triggered unexpected conditional logic. These become a focused human review queue. Only the images the system identified as uncertain are reviewed, not the full output.
According to the American Society of Quality, companies can save up to 20% on costs by implementing an effective quality control system. Exception-based QA, reviewing only what the system flags, outperforms full manual review in both speed and cost at every catalog size.
How to Build a Product Image Automation Workflow
Step 1: Audit your current image types
Map what your catalog contains on-model, off-model, lifestyle, infographics. Note which marketplaces each image type needs to serve and what their technical requirements are.
Amazon, Shopify, Zalando each have different specifications for canvas size, background and resolution. This audit takes two to three hours and prevents weeks of rework later.
Step 2: Define cropping rules per image type
For each image type from your audit, write the exact crop behavior you want.
For example, for front-facing dress images, crop from 10px above the head to 15px below the heel on a white 2000×2000 canvas. These written rules become the direct configuration input for your image automation platform.
Step 3: Configure your platform with a sample batch
Upload 50 to 100 representative images across your product categories. Configure the conditional logic engine using the rules from Step 2. Run the sample batch and review outputs against your specifications before processing at full volume.
Autophoto’s export logic allows you to define multiple simultaneous output variants per image, so one source file generates all your marketplace formats in a single pass.
Step 4: Connect intake and output to your existing stack
If images arrive via vendor SFTP or cloud storage, connect those as input sources. If finished images need to land in Shopify, a digital asset management system or a content management platform, configure the export destination accordingly.
Autophoto provides REST API and SFTP access for teams that need to integrate this pipeline into existing operations infrastructure.
Step 5: Run your first full batch and set a QA sampling rate
For the first full batch, manually review 10% of outputs. Once accuracy is confirmed across your image types, reduce the sample review to 3 to 5% and let the system’s exception flagging handle the rest.
Why Getting This Right Early Compounds Over Time
Employees who automate repetitive tasks estimate saving 240 hours per year, while company leaders estimate saving up to 360 hours from the same automation. For image teams processing 100+ SKUs per day, those hours are the difference between keeping pace with catalog growth and falling permanently behind it.
Teams that build the workflow before catalog scale hits avoid the rework tax. Standardizing 50,000 existing product images after the fact is significantly more expensive than building the right pipeline before the catalog reaches that size.
The global AI Image Editor Market is valued at USD 88.7 billion in 2025 and 80% of retail executives expect their businesses to adopt AI automation. Image automation is no longer advanced infrastructure for large enterprises. It is becoming standard practice for any ecommerce team managing a catalog that needs to stay consistent and competitive.
The pipeline described in this guide is not complicated to build. But it is very easy to put off until the cost of not having it becomes obvious.
Taking The Next Step
Product images break when the process behind them breaks. Manual editing cannot keep up with growing catalogs, marketplace requirements and consistency demands.
A product image automation workflow replaces that with a system that runs the same way every time: ingest, tag, crop and export.
Autophoto AI is built for this kind of high-volume, rules-based pipeline. It handles AI tagging, landmark-based cropping, background removal, shadow generation and conditional multi-format export without technical setup.
Start with a small representative batch. Set your rules and review the output across product types. That test run will show exactly what your workflow needs.
Still processing images one by one? See how Autophoto AI handles it at scale.