If you’re new to Autophoto or using it for the first time, one of the most important features you’ll come across is the Blueprint.
Think of a Blueprint as a recipe. Once created, you can apply it again and again to hundreds or even thousands of images without repeating the editing steps manually.
Whether you’re editing product photos, model shots, or catalog images, a Blueprint ensures that every image is edited with the same quality, style, and output settings.
In this first part, we’ll walk you through exactly how to create a Blueprint inside the Autophoto AI app. We’ll explain each step and show you how it works inside the tool.
Table of Contents
What is a Blueprint?
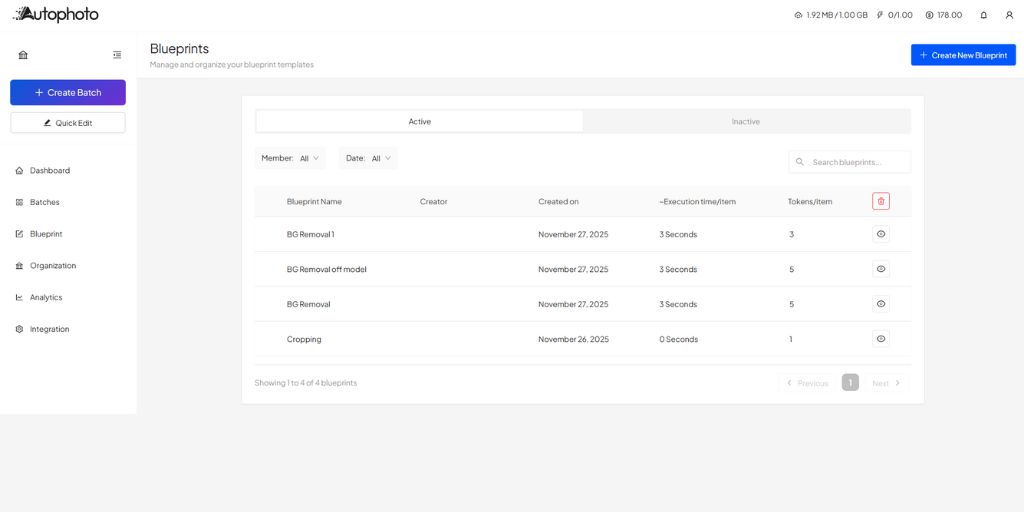
A Blueprint in Autophoto is your saved editing workflow, as shown in the image above. You decide:
- Which edits the AI should perform
- What export formats to use
- Which background type to apply
- What size or crop ratio for final images
- What conditions the image must match
Once you’ve set these rules, Autophoto follows them automatically whenever you run a batch.
In short:
You configure it once → Autophoto applies it every time.
Now let’s build your first one.
Step 1: Open the Blueprint Section
Creating a Blueprint is very simple once you know where everything is located. Here’s how to get there:
Go to your Dashboard → Click “Blueprints” in the left menu → On the top-right, click “Create Blueprint” → Inside the Blueprint editor, click “Add Nodes”
This opens the main workspace where all your editing steps will be added.
Step 2: Choose Your Editing Nodes
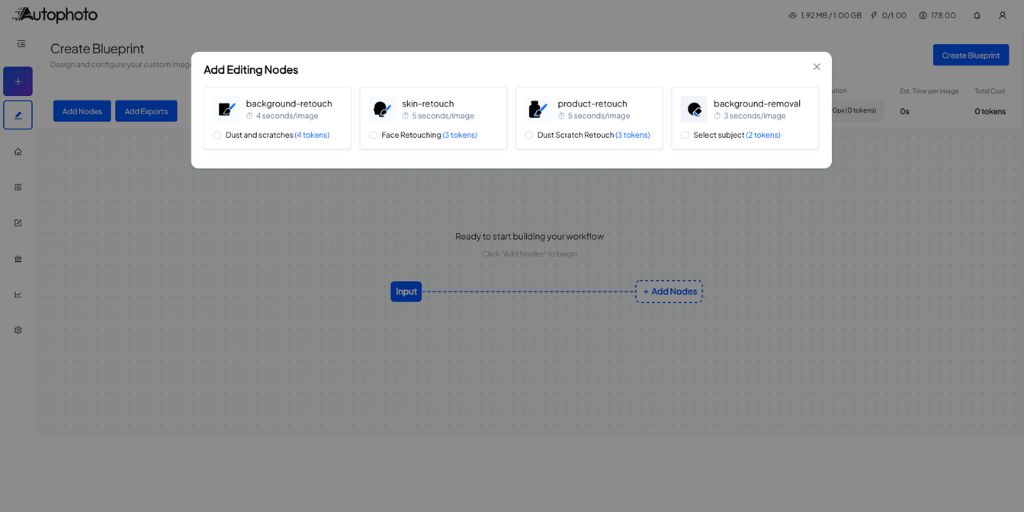
Nodes are the individual editing actions Autophoto performs on an image. You can add one or more, depending on your workflow. You’ll see four node options:
- Background Retouch – Removes dust, scratches, and dirt from backgrounds
- Background Remove – Cuts out the subject from the background
- Skin Retouch – Full-body skin cleanup for model photography
- Product Retouch – Removes dust and scratches from product shots
For this guide, we’ll use Background Remove as an example, since it’s the most commonly used node for both fashion and product workflows.
👉 Click on the node you want and it will appear inside your Blueprint editor.
Step 3: Add Your Export Settings
Once your editing node is selected, you need to define how your final output files should be exported.
Here’s how:
Click Add Export → Give your deliverable a name (e.g., “Batch 1”) → Select your file format(s)
Available Export Formats
Each format comes with different settings:
| Format | DPI | Background Options |
| PSD | Yes (300 or 72) | solid, transparent, original |
| PNG | No DPI | solid, transparent, original |
| JPG | Yes (300 or 72) | solid, original only |
| WebP | No DPI | solid, transparent, original |
Background options:
Autophoto gives you full control over the final background.
- Solid color – Apply a single-color background by entering the hex code of the desired color
- Transparent – No background (PNG/PSD/WebP only) → Natural Shadow (best for eCommerce product pages)
- Original background – Keeps the uploaded image exactly as it is
- Image background – Upload your own custom background
This allows you to create brand-consistent visuals without manual Photoshop work.
Choosing the Right DPI
DPI (dots per inch) determines whether your output is optimised for print or digital use.
- 72 DPI – For websites, online stores and digital catalogs
- 300 DPI – For professional print (catalogs, brochures, lookbooks, banners)
Quick Comparison:
| Feature | 72 DPI | 300 DPI |
| Best Use | Web, digital displays, on-screen viewing | Professional printing (brochures, banners, magazines, lookbooks) |
| Print Quality | Sufficient for screens, not ideal for print | Industry standard for crisp, detailed prints |
| File Size | Smaller files, load faster online | Larger files, require more storage |
Step 4: Set Your Image Sizing & Cropping
Define the final dimensions and crop of your output images. You have two options:
Option A: Original Size/Ratio
Keeps the exact dimensions of your uploaded image, no cropping or resizing applied.
Best for: Catalog uploads or workflows where you need to preserve the original framing.
Option B: Custom Ratio
Define precise dimensions and positioning:
- Height & Width- Set exact measurements
- Unit- Choose pixels (px), percentage (%) or aspect ratio
- Margins- Add spacing on top, bottom, left or right
- Alignment- Position the subject (center, left, right, top, bottom)
This is ideal for:
- Square crops for Instagram (1:1)
- Vertical formats for lookbooks (4:5)
- Marketplace-required dimensions (e.g., Amazon, Shopify)
| Pro Tip: After fixing width & height, enable Conditions and select “On-Model” to unlock advanced cropping features. |
Step 5: Add Conditions (Required)
Conditions tell Autophoto which types of images this Blueprint should process. This is a critical step that ensures accuracy and saves credits.
How Conditions Work:
If an uploaded image doesn’t match your selected conditions, it moves to Fallback, which means:
✗ The image won’t be edited
✓ Only the primary node credit is used (not the full editing cost)
This prevents incorrect edits and keeps your workflow clean.
Condition Type A: On-Model
Why does Autophoto AI do this?
Fashion brands need pixel-perfect consistency across catalogs. Autophoto’s body-aware AI detects human landmarks, analyzes poses, and applies intelligent crop boundaries to ensure every model shot follows your exact framing rules.
This eliminates inconsistent cropping and maintains brand uniformity at scale.
You’ll configure:
1. Shot Type
- On-Model
2. Frame Type
Choose how the model is framed:
- Full body
- Upper Portrait (waist up)
- Lower Portrait (waist down)
- Closeup
- Headshot
3. Pose Type (Available for Full/Upper/Lower Portrait only)
Select the model’s orientation:
- Front
- Back
- Side
- Action
4. Advanced Option: Landmark Cropping
When enabled, Autophoto uses AI to detect facial features, body landmarks or product edges to intelligently center and crop your images. This is particularly useful in fashion workflows.
For instance:
- Head to Waist
- Chin to Top
- Hand to Human
and more cropping points…
Who needs Landmark Cropping?
Retailers processing large batches where manual cropping isn’t scalable.
If you’re uploading dozens or hundreds of model shots and need the face or waistline at the exact same position in every frame, this feature automates what would otherwise require hours of Photoshop work per batch.
Condition Type B: Off-Model
Use this when your images show products only (no human model).
You’ll configure:
1. Shot Type
- Off-Model
2. Frame Type
Choose the product view:
- Closeup (detail shot)
- Full (entire product visible)
3. Product Category (If “Full” is selected)
Tell Autophoto what type of product it is:
- Bottomwear
- One-Piece Clothing
- Shoes
- Bags
- Socks
- Tops
- Accessories
- Boxes & Packaging
- Furniture
- Clothing Pairs & Sets
4. Subcategory (Varies by category)
Provide specific details:
Example for One-Piece Clothing:
- Dresses / Frocks / Jumpsuits / Swimwear
Example for Shoes:
- Pair or Single
- View: Outsole, Side, Styles, ¾ Back, ¾ Front, Top
Example for Bottomwear:
- Regular / Swimwear / Underwear / Shorts / Mini Skirts
Example for Accessories:
- Belt / Jewelry / Eyewear / Bottles / Caps / Beanies / Watches
This granular detail helps the AI process your images with maximum accuracy.
Understanding Fallback
If the uploaded image does not meet your selected conditions, it enters fallback.
Example scenario:
You set your Blueprint to process “Upper Portrait → On-Model → Front Pose”
But you upload a full-body side-angle shot.
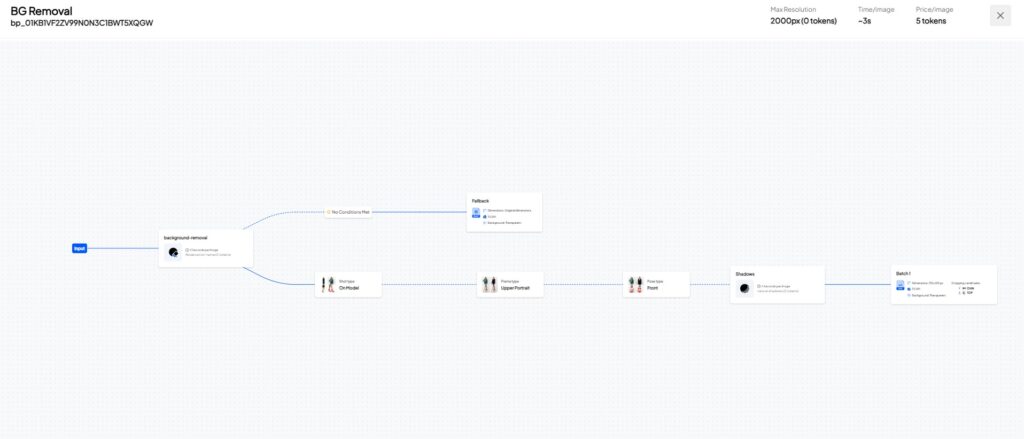
Result: Image goes to Fallback (not edited, minimal credit used)
This protects you from wasted edits and maintains quality control across your batch.
Use Case Examples
To help you understand how these settings work together, here are four practical Blueprint configurations.
Example A: On-Model “Upper Portrait” Frame Type
Scenario:
You’re processing model photos for an online fashion catalog and need consistent upper-body shots with transparent backgrounds.
Blueprint Configuration
1. Click “Add Node” → Select “Background Remove”
Exports
2. Click “Add Exports” → Add Deliverable name (e.g., Batch 1) → Select file format: PSD → DPI: 300 → Background: Transparent
Sizing & Cropping
3. Select define size → Dimensions: 512 × 512 px → Alignment: Center
Conditions Applied
- Shot Type: On-Model
- Frame Type: Upper Portrait
- Pose Type: Front
- Landmark Cropping Points: Chin to Top
Final Step
Click Save → Name your Blueprint (e.g., Upper Portrait Transparent BG) → Click Create Blueprint
Result
Every front-facing upper-portrait image will be cropped from chin to top of frame, aligned to the center, delivered at 512 × 512 px with a transparent background.
Example B: On-Model “Closeup” Frame Type
Scenario:
You’re processing model photos for an online fashion catalog and need consistent close-up shots with a solid background.
Blueprint Configuration
1. Click “Add Node” → Select “Background Remove”
Exports
2. Click “Add Exports” → Add Deliverable name (e.g., Batch 1.1) → Select file format: PSD → DPI: 300 → Background: Solid Color (e.g., #FFFFFF for white)
Sizing & Cropping
3. Select define size → Dimensions: 512 × 512 px → Alignment: Center
Conditions Applied
- Shot Type: On-Model
- Frame Type: Closeup
- Landmark Cropping points: Top to Hand
Final Step
Click Save → Name your Blueprint (e.g., Closeup Solid BG) → Click Create Blueprint
Result
Every close-up image will be cropped from top to hand, center aligned and exported at 512 × 512 px with a solid white background.
Example C: Off-Model “Full” Frame Type
Scenario:
You’re processing product-only shoe images for your eCommerce store and need consistent solid-background shots at a specific size.
Blueprint Configuration
1. Click “Add Node” → Select “Background Remove”
Exports
2. Click “Add Exports” → Add Deliverable name (e.g., Batch 2) → Select file format: JPG → DPI: 72 → Background: Solid Color (e.g., #F0F0F0 for light gray) → Shadow: Natural
Sizing & Cropping
3. Select define size → Dimensions: 1024 × 1024 px → Margins: Top: 50 px, Right: 50 px, Left: 50 px, Bottom: 200 px → Alignment: Center
Conditions Applied
- Shot Type: Off-Model
- Frame Type: Full
- Product Category: Shoes
- Sub-Category: Single Shoe
- Shoe Angle: Side
Final Step
Click Save → Name your Blueprint (e.g., Single Shoe – Side View – Light Gray BG) → Click Create Blueprint
Result
Every side-angle single shoe image will be processed with background removed, placed on a light gray background with natural shadow and exported as a 1024×1024 px JPG at print quality (72 DPI) ready for marketplace listings like Amazon or Shopify.
Example D: Off-Model Bottomwear (Apparel)
Scenario:
You’re processing flat-lay or ghost mannequin shots of pants, shorts or other bottomwear for digital catalog use, preserving the original product dimensions.
Blueprint Configuration
1. Click “Add Node” → Select “Background Remove”
Exports
2. Click “Add Exports” → Add Deliverable name (e.g., Batch 2.1) → Select file format: PSD → DPI: 72 → Background: Transparent
Sizing & Cropping
3. Select Original size/ratio (no resizing applied)
Conditions Applied
- Shot Type: Off-Model
- Frame Type: Full
- Product Category: Bottomwear
- Sub-Category: Swimwear
Final Step
Click Save → Name your Blueprint (e.g., Bottomwear – Original Size – Transparent) → Click Create Blueprint
Result
Every full-frame bottomwear image (pants, jeans, shorts) will have its background removed with a natural shadow, exported as a layered PSD file at web resolution (72 DPI) while maintaining the original image dimensions. Ideal for quick web uploads or further editing in Photoshop.
Step 6: Running a Batch Using Your Blueprint
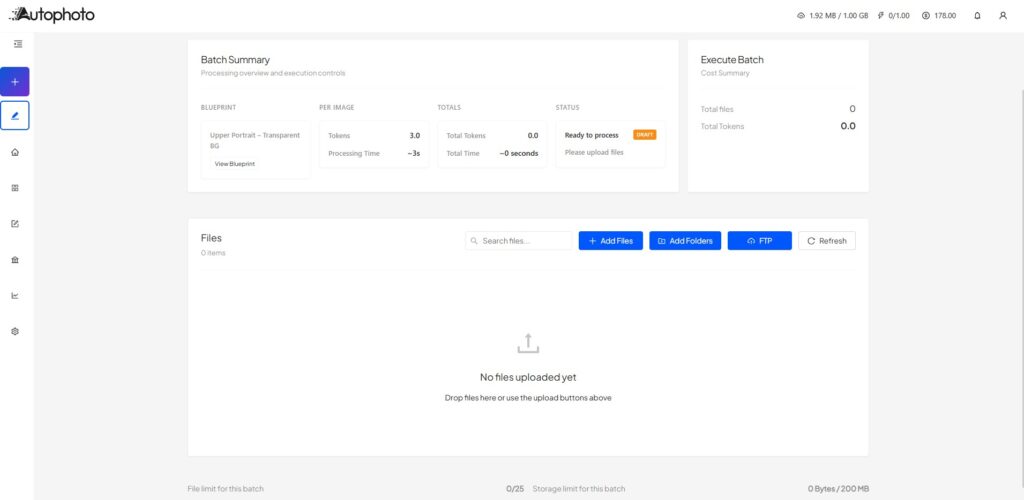
Now that your Blueprint is ready, here’s how to process your images:
Create Batch → Enter a batch name → Select Blueprint → Review the batch summary → Upload your files (drag & drop, add files/folders or use FTP) → Execute Batch → Preview results → Click to start processing → Download your edited images
| Remember: Only images matching your Blueprint conditions will be processed. Images that do not match will be sent to Fallback and remain unedited. |
Step 7: Non-Destructive Structured Folder System
Autophoto automatically organizes your outputs into folders based on your deliverable names.
- No manual sorting required
- Folder structure remains the same as your upload
- File names stay unchanged
- Exports are neatly separated
This is extremely helpful for studios handling large volumes of images.
Step 8: Live Preview & Editor Manager
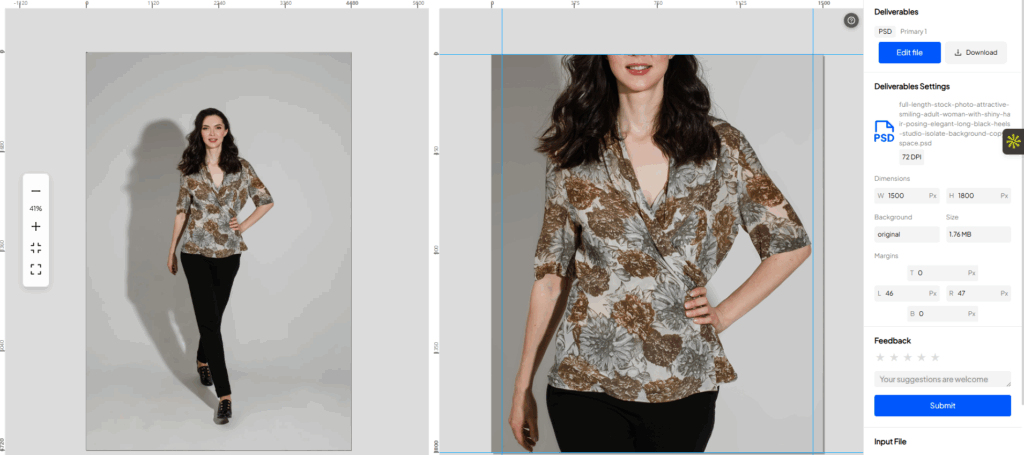
Before downloading, you can:
- Preview your processed images
- Make small fixes directly in the browser if the AI misses something
- Save those edits instantly
This eliminates the need to open Photoshop, make minor corrections and save the file again.
| Bonus: Autophoto also provides layered PSD files, giving you full flexibility for complex edits whenever you need them. |
Taking the Next Step
Congratulations! You’ve just created your first Blueprint in Autophoto AI.
You’re no longer editing images manually. Your Blueprint now automates the entire process from applying your exact specifications to every image while maintaining brand consistency across model shoots, lifestyle photos and product catalogs.
What’s Next?
This is Part 1 of our series. Coming up:
- How to use Autophoto Templates?
- How to set up your Autophoto account?
So, start your free trial! New users get 100 free tokens to test the Blueprint and see the automation in action. No credit card required.